“To know where you are going, you need to know where you are coming from.”
Today, with quality family-time being so limited we don’t have as much time to sit down with our kids and talk about our family histories. Where did our grandparents came from, and their grandparents?
Below is an amazing family tree project that you can work on together with your child(ren). They will enjoy to have fun drawing, painting and colouring their tree while learning about their family history.
Method:
On a piece of paper draw the outline of a tree, and on the bottom branch put your child’s name. Then, working backwards and upwards, put your name and a spouse/partner's name and then your parents' names, branching up from each side and so on. Work your way up the tree branches as far back in your family as you know.
You can add the following details to make it more interesting: Date of Birth, Country of Birth and Photographs.
Note: Older children should be encouraged to draw their own tree, and fill in the names of relatives on the branches as you discuss your family history together. They may also want to interview other family members to try and gather even more information, if available.
Have fun growing together!
We all have THOSE days when we turn to our pantry or fridge late in the day
and ask, 'what shall I make for dinner?' The way of dealing this problem is a
life skill that can be developed from a young age, along with children's confidence to directly confront challenges.
Consider offering your child the chance to plan a meal for a night in your home and develop their confidence in the kitchen using ingredients already in your pantry or fridge.
Method:
1. Have your child make a list of main ingredients already in your kitchen which he or she would like to include in a family meal; for example, macaroni, tomato sauce, peppers, cheese.
2. Enter the ingredients in an Internet search bar like Google, or on a recipe website such as allrecipes.com, food.com or foodnetwork.com.
3. Choose a recipe from the search results to make and enjoy .
PS Last weekend we enjoyed a new pasta bake as a result of this activity,
searching 'pasta, bake, marinara sauce': http://realmomkitchen.com/6196/super-fast-pasta-bake/
Bon Appetit and happy planning!
At the beginning of this post, we should apologize to Godiva Chocolatier for sharing the secret to making Chocolate Covered Strawberries ... in fact, the process is easy enough for children to help, and develop their confidence in the kitchen at the same time.
Chocolate Covered Strawberries
You will need:
Whole Strawberries
Semi-sweet chocolate chips or chopped chocolate
White chocolate chips or chopped chocolate (optional)
Oil
Parchment Paper
Method:
1. Line a baking tray with parchment paper.
2. Wash and dry the strawberries.
3. Place the semi-sweet chocolate in a microwave-safe bowl and melt it, making sure the chocolate does not burn. This step, along with step 4 should be completed by an adult as the bowl containing the chocolate can get very hot. *
4. Add a few drops of oil to the melted chocolate and mix it in with a spoon, to make the chocolate a little smoother.
5. Let the chocolate cool for a few minutes, taking care to make sure the outside of the bowl and melted chocolate isn't still hot before your child takes over with the truly fun part in step 6.
6. Each strawberry can now be dipped in the chocolate by your child and placed carefully on the parchment lined tray.
7. If you and your child want to get even fancier, melt the white chocolate in a similiar fashion to the semi-sweet chocolate in steps three to five, once all of the strawberries have been dipped. Then have your child take a spoon, and drizzle the white chocolate across the strawberries, to create a zig zag pattern.
8. Place the tray of strawberries into the refrigerator for the chocolate to harden.
* The chocolate can alternatively be melted in a double-boiler and transferred to a bowl to cool.
Chocolate covered strawberries provide a great hostess gift or dessert for your own table. Best of all, it can be kid-made with beautiful results.
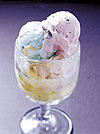 As the weather starts to get warmer, many children (and kids at heart) have ice cream on their minds.
Let your child stretch their imaginations while thinking about this delicious summer treat, by creating a new flavour of ice cream. Pickles? Pizza? Popcorn? The possibilities for brainstorming and creativity are endless.
Method:
1. Tell your child that today she or he is going to pretend to be an ice cream maker and create a new flavour of ice cream.
2. Brainstorm a list of new ice cream flavours together with your child. Then have him or her choose their favourite flavour to develop.
3. Ask your child to describe what their ice cream would look like. Ask him or her to consider the ice cream's colour(s), texture and added ingredients.
4. Let your child draw their new ice cream scooped into a cone or a cup.
Challenges:
1. Ask your child to come up with a name for their ice cream. For example, I'm in a Pickle.
2. Browse the Internet together: (i) to determine whether your child's new ice cream flavour actually already exists, what it looks like and the ingredients included (if available); and (ii) to build their research skills while having fun.
Sweet dreams to you!
News around the world is relevant to our lives, regardless where we live. Many children also become exposed through television, radio, newspapers, computers and discussions with friends, and understanding the implications can often be confusing for them.
That's why we are excited to share the website http://www.teachingkidsnews.com/ with you. It offers "timely, relevant news articles for kids, educators in the classroom and parents at home." Teaching Kids News provides the chance for children to analyze what is happening in the world around them, through a child-friendly voice.
Check out the website and introduce it to your child, if and when you think it is appropriate. That's all for today ... back to you moms and dads. :-)
Home-made pizza dough offers lots of great advantages:
1) It is a recipe that kids love to help you make, and so the process helps to develop their kitchen skills, and their need to knead.
2) Pizza dough recipes use ingredients that most people have on hand in their cupboards.
3) Pizza is one of those foods that most kids enjoy eating, making it a great option for weeknight meals and dinner with family friends.
... and that's why we are pleased to share a delicious pizza dough recipe we recently found.
See: http://allrecipes.com/recipe/master-pizza-dough/Bon Appetito!
 Reading is an important part of learning. Imaginations are peeked through hearing different stories, and the chance to travel to other places and times through words and descriptions.
Visit the library to find books celebrating the winter season. Then have your child enjoy reading the stories alone or together with you. Please feel free to share your favourites in our comments. We love to be inspired by your ideas and experiences.
We have also included a great list of winter picture books below for you to consider.
Stories:
1. A Snowgirl Named Just Sue by Mark Kimball Moulton.
2. Deep Snow by Robert Munsch.
3. Jillian Jiggs and the Great Big Snow by Phoebe Gillman.
4. Stella, Queen of the Snow by Marie-Louise Gay.
 We have a fun word game to play together, that celebrates the winter season and can be enjoyed anywhere. We have called it I went to a Winter Festival, and it develops brainstorming, listening and memory skills.
Explain the rules to all players and let the winter wonderland fun begin.
Steps:
1. The first person says, I went to a winter festival, and states what s/he brought. For example, I went to a winter festival and I brought mittens.
2. The next person repeats what the first person brought and their own new item. For example, I went to a winter festival and I brought mittens and hot chocolate.
3. The next person repeats the first two items and adds their own. For example, I went to a winter festival and I brought mittens, hot chocolate and a hockey stick.
4. The game continues with players getting subsequent turns in order.
A person is out when s/he forgets the pattern of what is brought along. Alternatively, the players can just help others remember and the game can continue until you wish to move on to another activity.
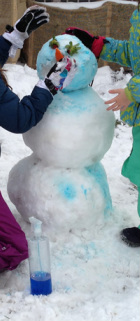 Now that you have discussed the skills involved in Snowman Building based on our last post (creating a job classified ad), it's time to get active in creating your own snowman.
Tell your young snowman builders that they have been hired for the job. Then enjoy the following steps together ...
Steps:
1. Design the snowman you wish to create on paper together.
2. Discuss what items you would need to complete your snowman. You may need to add clothing, such as a hat or scarf, or items to use for facial features or limbs, such as branches or a carrot for a nose.
If you live in a climate without snow, this discussion may complete the activity; however, if you have snow in your neighbourhood for building, gather the required items together to begin the building experience.
You may also wish to 'paint' your snowman by mixing food colour with water and puting it in a spray bottle. If so, remember to keep the spray away from clothing to avoid staining.
3. Bundle up and begin implementing your design.
4. Have your child(ren) take a photograph or draw a picture of the snowman so that you can remember your snowman.
Challenge:
1. Compare the after photo or picture of your snowman, with your original design. Discuss the similarities and differences.
2. Research the snow sculptures/snowmen which other people and professionals have created on the internet. Discuss your favourite finds, and what makes each appeal or not appeal to you.
 Winter offers many opportunities for creativity and active play. If you live in a climate with snow, the beauty of a winter wonderland in itself can tickle children's imaginations.
All this week, we will be focusing on winter themes to offer activities to develop Creative IQ (TM) with your child(ren).
Since we want your child to feel involved in creating the fun, we will start with examining a WANTED or job classified ad ... in this case WANTED: A Snowman Designer.
Steps:
1. Describe a job classified ad to your child as an advertisement looking to hire someone for a job. You can show examples in the newspaper or examine online ads together.
Explain how such an ad often includes the job title, the qualities and/or experience needed, the requirements of the job, and the contact information for the place of employment.
2. Brainstorm the (i) qualitities and/or experience needed, and (ii) job requirments for a Snowman Designer. You may choose to write down your list.
3. Create a job classified ad for a Snowman Designer and write it down or type it on the computer.
Challenge:
Ask your child to create job classified ads for other winter activities. Brainstorm job titles together, or have your child choose from the following list: Professional hockey player, figure skater, winter festival organizer, polar bear keeper, hot chocolate maker or toboggan hill referee.
|
 RSS Feed